Translate

Showing posts with label christmas. Show all posts

Friday, 23 December 2016

Christmas house decoration, Free Printable


Hello, Just a quick mini printable before Christmas! This is a scaled down version of a lovely french card model that was posted on flickr by Patricia, this little house is called Chalet Suedois. I absolutely love her Flickr site, and have made up quite a few of the models she has very kindly scanned and shared.

I made this tiny card model a few years ago, but decided to put a printable of it up, which is a little different from that shown above. I've now put yellow in every window, so that anyone who doesn't want to cut the windows out will have the "lights on" in the house. I also darkened the colours in one version. I've printed neither of these new printables, but I hope they'll be ok...its almost Christmas Eve, no time, no time :D

The snow is a mixture of bicarbonate of soda and glue, with some glitter mixed in for sparkle. I'm afraid I have no ratio for that, it was a bit hit and miss as I remember.... and a few layers of it as well. 

...there are also no instructions per se, I'm hoping anybody that prints them out will be able to figure out what goes where, though I've a few pointers ahead. Oh and the finished one should help out if needed, I hope. I'm not one for tabs, but I've put a few in anyway. Just play around with it! You can do it! :D


Unfortunately my Christmas tree lights are broken and this isn't as pretty as it could have been...

Don't forget to score these and crease accordingly, I remember being stumped by this briefly.. One wall higher than the other? Oh I see....(refer to finished model). That is the balcony floating above the wall, and goes on the front of the house above the door.


And that's everything in the printable, a base, two rooves, the main building, the gable ends and two chimneys (which I wouldn't bother with :D), oh and a tiny fiddly balcony too.  Those arrows are everywhere that needs creased, do not cut! This is the dark version in this image. It's basically a fancy Putz house that you can add more to as you see fit.

You can remove the smaller roofed building so that it can be placed further back on the large roof, or just leave it as is.


Links to both printables below!


Well this was a bit thrown together and last minute, as I'm sure you can tell. Have a great Christmas!

Sarah x

Saturday, 6 December 2014

1:12 scale Christmas boxes - Super bumper edition printable! :D

Happy Christmas! I'm a tiny bit late with this one. I haven't even got my 1:1 decorations out of the attic yet, but the miniature ones appear to have been brought down. Priorities! :D

Quite a few of the images used for this printable are from Joannes flickr site Take a break. Joanne very kindly uploads a lot of ephemera for other crafters to use free of charge. She used to make dollshouses too! Small world eh? Other images were very poor quality sourced from eBay and fixed up for printing, which I'll probably explain more about in the future, for example the doubl-glo box was very low resolution, and both tinsel boxes are made from copying and pasting bits and pieces together ala Dr Frankenstein :D

The Santa (who needs his face repainted) is an old resin Christmas decoration, the Christmas lights were made using Miyuki beads and green thread for the wire. The plug is a piece of dowel, coloured with felt tip and with wire as pins. I used a plastic clothing label tie to create little bulb tips in each Miyuki bead (very hard to see). The miniature tree is a handmade bottle brush trimmed into a tree shape, with some railway modellers flock applied and no hole beads, and it's unfinished! :D Sort of threw everything together for this scene!  One of the bulbs has fallen off :(

For the printable, I recommend using a sharp craft knife for cutting out the boxes! I used one of those Swan Morton ones.

For best results print at Fine quality, on to 220GSM card.

Link for PDF below.


After printing lightly spray with fixative (or hairspray) to seal the ink.

If you need any tips on cutting out the boxes, etc, for a neat fit, the start of this post has a few. I find tabs annoying to cut out and unpredictable at this size (making the box lid too tight for the base etc.), so I make tabs later on, using paper. See the bottom half of this post for a picture explanation, under the title Shoeboxes and boxes.

I recently bought a bone creaser/folder, highly recommended if you do a lot of this sort of thing! It has saved my nails, which were actually wearing away from all of the creasing....

Cut out all of the windows before cutting out the individual boxes. For the fiddly windows,ie, curvy, spiky areas, use short cuts to help preserve the details, rather than trying to follow the line in one go.


Unlike the other boxes, DO NOT cut out the window on the two tinsel boxes, until the sides have been creased. The tinsel is a fly tying material called Chenille Sparkle, which I bought from Troutcatchers. If your husband/son etc, fishes, I wholly support you nicking from his stash of fly tying equipment :D There are some card pieces in the printable that you can use to wrap the tinsel around.

On the printable G, W, R stands for Green, White, Red, just pencil those onto the boxes, so you know which base belongs to which lid, as the sizes are slightly different. The dividers are also on the template, and are for these 3 boxes. 6mm beads and smaller will fit the boxes.

Unfortunately I couldn't mark out the cuts for printing, so you will need to measure and mark those out. Each slot should be 7mm apart. Make the first cut for a slot, then place the knife directly beside it and make another cut, then use the tip of the knife to remove the "slot" waste. Then the pieces will all slot together nicely.

Some of the other boxes in the printable. You can use cellophane of some sort, to create plastic windows too,  I haven't done that yet....

If you cut out the middle row of trees on the Holiday snow box, you can then put a bit of cotton wool or wadding in the box, and it will show through.

I've included some Christmas Cards in the printable, not shown here. The card might be a bit too thick, but if you run your finger nail or bone creaser along the edges of the card, it should give the illusion of  thinner card.

There are also interior cards for the two Christmas Light/ Lamp boxes, which are a bit awkward to fit, but you can play about with them, as you see fit. I ended up chopping some off.

The plain white card bases (in the printable) need to be creased and folded so that the black lines will be on the inside.

Any idea how to make miniature icicle ornaments? :D


And I think that's it! They would make nice little Christmas ornaments too, with a bit of thread on them and everything glued into place. I would love to see them in a Christmas setting, stall or attic, anything really, so if you make them up, leave a link below :)

 Also, I recently received a package of exquisite miniatures from Pepper, which I can't wait to post about, then that'll be me for this year! :D But even though it's a bit early, I think it is anyway, I wish you all a Happy Christmas, in case I miss you next time due to it being that time of the year ie. Hectic! :D

Sunday, 12 January 2014

1:12 scale Pine cone tutorial


You will need:-

  • Fine pointed tweezers
  • Heavy stock paper (I used paper from a scrapbook, I think it would be described as heavy)
  • Pva glue
  • Fimo
  • Wire
  • Flower paper punch
  • Nail scissors


I used a Woodware paperpunch, though any flower paper punch will do, so long as the petals are fairly narrow. 


Make a small ball with fimo, then carefully pinch one end, rolling it roughly into this shape, and then insert a wire into it. You can make them a little bit bigger than this, it just takes longer to stick the scales on. Then bake, according to the instructions on the fimo packet. Though, when the fimo is this small, I think you can bake for half the time the instructions say.


Punch out some flowers, I only used the petals from two and a half flowers of this lot, for the fimo base above. Use a stylus tool to cup the tips of each petal.


Using nail scissors snip the ends off, of each petal........


...and store in a receptacle of some sort. Do not cough or sigh heavily with boredom (involuntary around the second or third pine cone) or the scales will fly all over the show :D


You won't need to do this for the first row. Hold the scale in the tweezers as shown, with the concave side facing upwards.


Then using your fingertip and thumb pinch the sides up the way.


Apply a line of glue near the base as shown. I use a fine tip applicator, which makes gluing a lot easier.


Arrange the scales as shown, with the convex side facing out. You do not need to pinch these scales, before attaching. Moisten your fingertip, ok, I dab my fingertip on my tongue, and then lift a scale that way, and then you can manipulate the scale with the fine tip tweezers more easily. Lifting a scale using tweezers from a flat surface is nightmarish.
When doing each row of scales, it is best to make sure the glue in the last row has dried, otherwise you might dislodge a few scales. Having a couple of pine cones in the making gives you something to work on, whilst a row dries. 


Add a second row of scales, (with the concave side facing inwards, and the convex outwards) and layer these so they have the effect of roof shingles. Instead of applying glue to the fimo, as in the first row, I put a blob of pva glue out, on to the nearest non absorbent surface usually, and dip the base of the scale in to it, before attaching to the fimo base. These scales should be pinched lightly first. Position the scale so just the cut edge is attached. I also put the wire into a brass tube off cut, to make the pine cone easier to work with, which I can put into a small glass or likewise, when I need both my hands for pinching the scales or something.


At about the third row, on my fimo base, you can see the ball is disappearing. In nature the pine cone scales would be getting smaller and fewer as they spiral inwards toward the top (and at the base too, but I just ignore the base) and still maintain a regular spiral overlap. Anyway, because the scales are all the same size, you will have to use artistic judgement to decide where to put the scales, so you have the appearance of regular overlaps, this is why the pinching of the scales is important, particularly near the top.


Once the glue has dried, you can paint them with slightly watery acrylic paint, though work quickly as the water will soak through and soften the glue, which may cause the scales to fall off or move from position. 


You can also roll the pine cone between your fingertips, to close the scales. I used some water colour paint on this one, which has caused the paper to swell, my acrylic paints are in the attic, and I was too lazy to go up and get them :D So avoid using water colour paint.

You can leave the wire in the pine cone, if you want to attach it to something that way, or just snip it off.


These are larger pine cones, than the one in this tutorial, and take a bit longer to do, as they have more scales. They are about 8mm high. That would make them about 10cm high in real life. I painted these with slightly watery acrylic paint, and dry brushed the scales with white acrylic paint, and used the tweezers to bend the scales back a bit.


Sunday, 22 December 2013

Happy Miniature Christmas!

Really late with this Christmas post, and nearly everything that I wanted to do, hasn't been done. I didn't think that little decorations would take so much time to make, so no mince pies or turkey, not even time for the presents under the tree, yet again! And then I had to remove the cat hair from the tree and garland. Hoovers do not remove cat hair, so it was cellotape and tweezers for that job. I will not be leaving those lying around, EVER AGAIN, MINNIE (the name of that cat). So this is a work in progress for next year, I think I will have to make the festive items throughout next year, starting from the beginning of 2014.

Anyway, do come in, though it is a little sparse...don't stay too long, as there is LITERALLY NOTHING TO EAT OR DRINK.

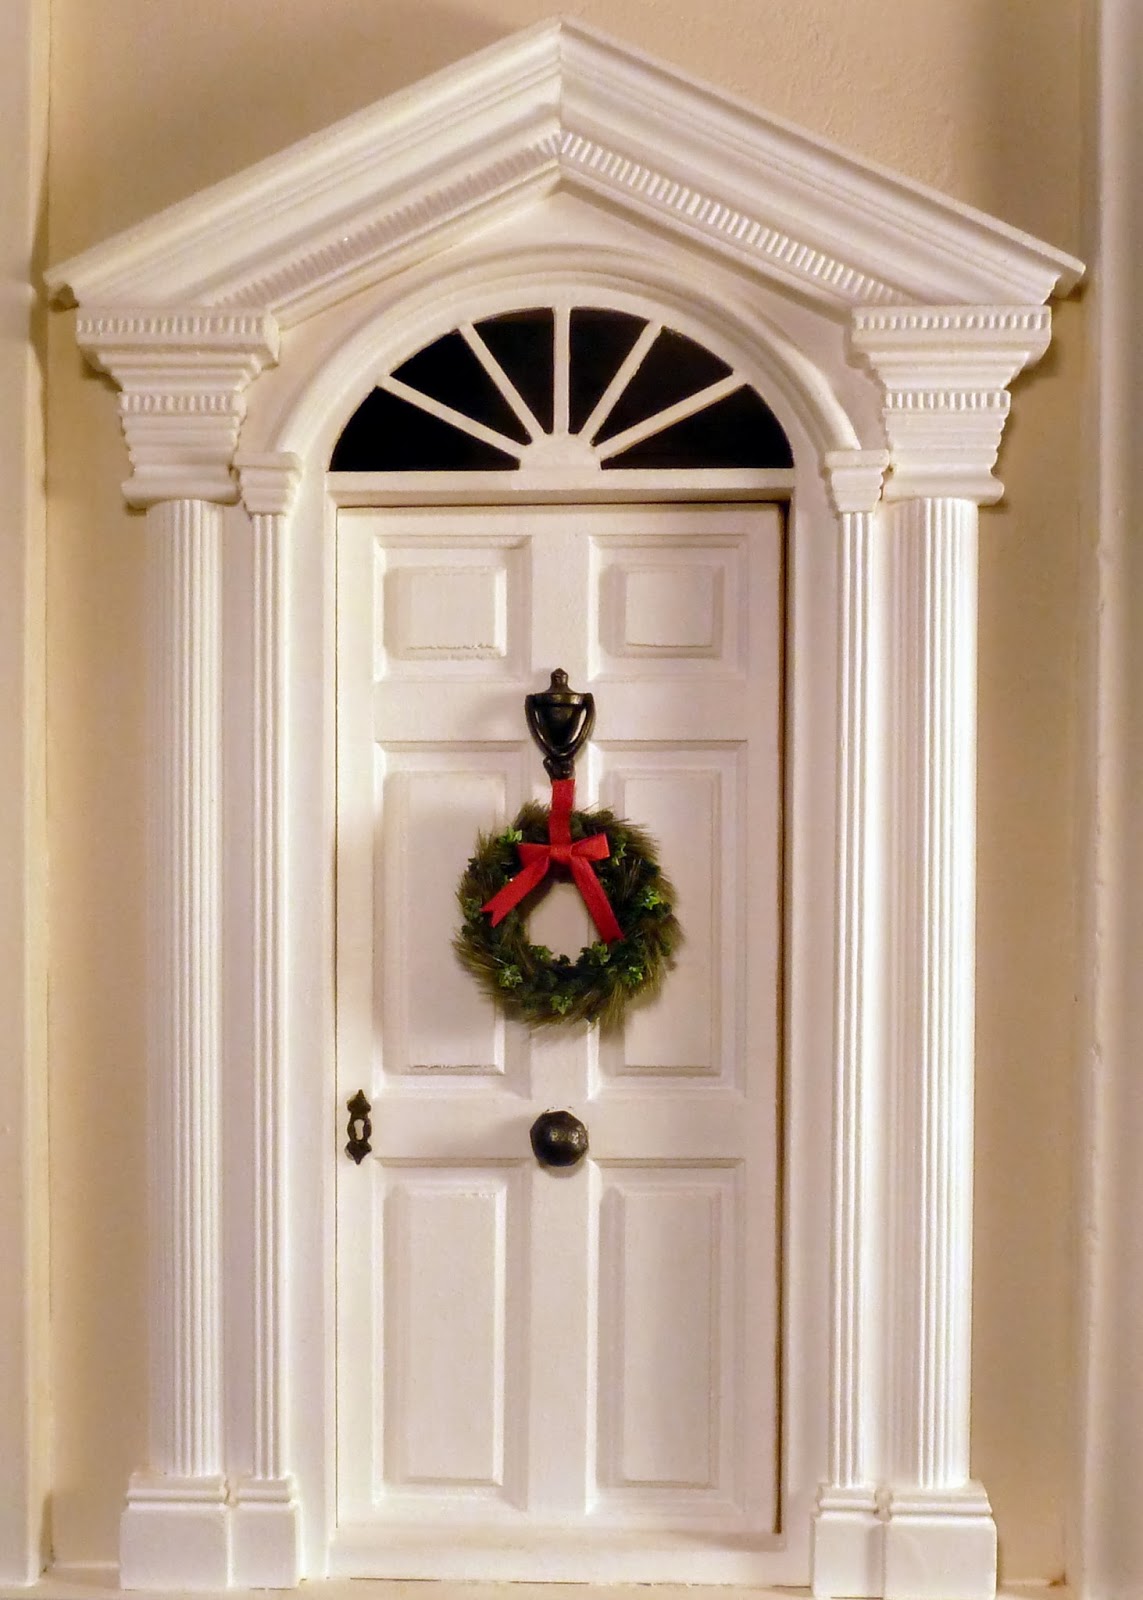
The front door is a bought one, the door furniture is by Tony Hooper. The miniature wreath base is a keyring fob, covered with tufts of model railway grass, fine chenille yarn and brass ivy leaves, the bow is made with raffia ribbon. The wreath is not actually finished, neither is the door :D 


 The fireplace was an old resin one I had, which I modified by cutting out the old fire basket, and replacing it with a phoenix miniature one. Though it should sit further back than that, which would require cutting a hole in the wall or making a false back.  The hearth is made with Richard Stacey tiles, left over from the kitchen floor. The fender was made with miniature scale dado rail, beads, copper rod and card. Oh, and the needlepoint rug is FINISHED. Without a fringed edge, I haven't worked up the nerve to try doing that yet. 


The mirror frame was made using miniature frame wood, with pieces of brass stamping arranged over it and then painted. The branch is an Alder twig, with the cones removed and brushed lightly with white paint, you can't see the ornaments very well, but they are Swarovski crystals. The garland was made using the same materials as the wreath minus the ivy. The stag is an old sterling silver charm.  The star tree topper is a jewellery finding mounted on a wire spiral. The fire logs......are not very artistically arranged :D I just bunged them in. Shopping list for next year, fire lighting and led nano chips for the tree.


Donkey had some otoplasty done for Christmas, my treat, I ripped his old ears off, and gave him some new finer ones. By pasting the back of some fabric with pva glue, I was able to cut out new ears without the edges fraying, which is how Bears' ears were done. The base of the ear is then glued into a slot on the head.  The skates are pretending to be drying off. I had wanted to hang them somewhere, but at the moment there is nowhere to hang them :D


 The baubles are a mix of beads, filigree, fluted and swarovski. Each bauble has a silver crimp bead superglued on the top with a wire loop to attach the waxed thread loops. Which took forever to do, and when I thought I had made enough the tree was only one third decorated.  The robins I made last year, the snowflakes are lasercut paper from True2Scale. The tinsel is Turrall chenille sparkle in micro. 


The dresser is a bought one, with the doors and drawers customised. The star ornaments on the "nail head" handles are jewellery findings, with no hole beads glued onto them. (The dresser needs feet, the phoenix fridge, isn't finished either...)


The runner is an old ribbon, the design is woven into it, I have been saving it for years....  The candle is a cocktail stick painted and dipped in wax. The twine heart is made from paper covered wire, wrapped with thread. The "bells" are crimp beads on wire. The pine cones are made with paper.  The key is by Tony Hooper. The owl is a sterling silver charm. The bauble garland is made with small filigree beads and miyuki glass beads. The finer chain was one I bought on Ebay last year. The wooden heart, is just that, with a piece of detail from a postage stamp stuck to the front.


The snowdrops are a Georgie Steeds kit. A plate of mince pies or christmas biscuits, would have looked nice and festive beside that pot..just pretend they are there :D


Not much to say here really, except that I hope I have not lost the handle of the fridge, I have just realised, it isn't there :D


"FAKE snowdrops!!!!!!"


Teddies do not drink or eat anyway, but they look great sitting beside empty tea cups and a giant matchstick.


Shake paws :) I don't know why he is smirking..
And that is Christmas here, over......I am really annoyed there were no mince pies!

Hope you all have a lovely Christmas and New Year! Thanks everyone for following and for your comments this past year.


Thursday, 31 October 2013

1:12 scale Victorian style Ice skates

I realise today is Halloween, but I have been busy getting ready for Christmas. It had crossed my mind to put some sliced fingers on the "ice" though, which would have made a horrible Halloweeny themed horror image or just the scene of a terrible accident! 

The ice skates are the first object of my Christmas display to be finished. They are made with real leather, with a wooden heel, thin card soles and laced up with thread. I made a pair of small fimo feet, to glue the leather over. They also have a tongue at the front and loops on the back.  The metal skates are by Phoenix Model Developments, and they dictate the size of the boot, the sole of these boots are 23mm long which would make these about a UK ladies size 7. A white pair would have been more what I was after, but I only had brown glove leather (p.s. you cannot paint leather, it looks awful, I tried it). The pine cones are made using paper and paint with a fimo base, I used a small flower punch to make the "scales" for those.  

I am also working on decorations, garlands, wreaths and candles, which aren't quite finished yet, but everything is in the final stages, I might just be finished in time for Christmas.

The sky here has been very cloudy with the odd burst of sunlight, so not great for taking photographs, hence the odd lighting, as usual.

The ice is wax and the snow is salt. The clumps of grass poking through are railway modellers field grass.


Terrible lighting.........I will take better photographs when the weather picks up.

Miniature cobbling. The metal skates are by Phoenix Miniatures www.phoenixmodeldevelopments.com/ I had to come up with the pattern for the boots by looking at pictures of real ice skates and shoe patterns, and somehow managed to make it work, though the leather stretches a bit, which helped enormously. I used a beading needle to lace them up, before they were glued onto the fimo foot.  Thankfully, the rest of the table didn't make it into the frame, it is a complete mess beyond the edges of the photograph. Who would have thought you could turn a room upside down making something so small :D


Tiny teddy base sculpt using fimo.  He has since been furred and "earred" and is ready for Christmas, but his eyes have to be painted, and unfortunately, the black paint had dried up....must put the lids back on the tins properly in future!  I think I may have mentioned this before, but I find it easier to make a rough shape of something in fimo, and then refine it after it has been baked, using exacto knives and files. The wires are there just to hold him together. He is fully jointed.

I think he will be called Shrug.

Friday, 4 January 2013

Spindle Back Arm chair by Colin Bird... and a bit late / very early Christmas tree.

I first saw Colin Birds chairs on his website. And although the pictures show how amazing they are, it isn't until you have one "in person" that you realise just how dainty they are. When I saw them all sitting together at his stall at Miniatura, I put one on my Christmas list, though I had to order early, as there is a waiting list, not surprisingly, and the chairs are made from scratch so they take time to make. Colin Bird explains the details of his craft on his website http://www.colinbird.co.uk/about.html. He has also written an article, for AIM, about bending wood, which I will definitely have a go at sometime. http://www.artisansinminiature.com/photo2_3.html

I haven't taken as many pictures as I would like to, as the light levels here have been bad, due to the cloudy weather. And it is hard to photograph the chair well, without distortion.  I have used lamps for lighting today, which I hate to do, but they haven't come out too badly.


Spindle Back Arm Chair by Colin Bird http://www.colinbird.co.uk/index.html.  Made with Cherry wood and Laburnum (seat).  The Cherry wood is sourced from a Cherry tree in Colins garden. The chair is incredibly light, yet strong with a beautiful sheen and depth to the wood. You can see the spindles reflect on the seat in this photograph. So much time and skill in this tiny chair. The chair is signed, discreetly on the underside of the seat.


No Christmas presents, except the chair of course, which my dad bought for me.   I made the tree using pipe cleaners, cocktail sticks, dowelling and acrylic paint. The star is cut from a brass sheet, using a jewellers saw.  Pot is temporary. It is a miniature terracotta pot, painted silver.  The tree is a magnet for cat hair and fluff.  Little presents for next year maybe.


Handmade Christmas decorations. Cut out of wood and perspex using a jewellers saw.  The robins are handpainted on both sides,  and each ornament has a tiny hole drilled, with the cord and wire glued in place.  The silver chain I bought on Ebay.


And the rug is almost finished, sort of. 

Christmas in the new conservatory, which I've been busy with lately. Almost finished. The outdoor scene is a magazine page, which is just there today for fun.

Happy Belated Christmas and New Year!!

Wednesday, 17 October 2012

1:12 sofa, just needs feet!

1:12 sofa made from wood, dowel, fabric (Brodnax prints - Oakwood cotton), felt and padding. Another miniature project that has been lying around for months. The design is based on a Howard and Sons sofa of the Edwardian period. The feet are only temporary, they are much too bulky. Either I buy a lathe and make them myself, or commission someone to do it for me. The sofa was quite tricky to make. Whilst the base was quite simple to make, I had to make it smaller to compensate for the padding and fabric which would add bulk. Then the upholstering, which I can't even begin to explain without a lot of pictures and diagrams etc... I regret not doing that, but I was too busy making it. Definitely a learning experience, this one.. I hadn't remembered to keep the fabric lined up with the base and the back, that was a complete fluke, very lucky, as the fabric was £10 with very little there for error. 


I used a piece of formed wire under the fabric, to clamp the fabric around the arm,  and to prevent uneven bunching. The side piece is slightly too long, but this mistake isn't too noticeable, I hope. 

Quite a deep sofa, plenty of room for cushions and throws and hopefully, miniature cats.

Sofa base, wood and balsa wood. The arms and back have a length of dowel glued on, sanded into shape, and then covered with felt and then plain fabric. The patterned fabric was glued on to card (cut to fit and with a layer of padding in between) and glued in to place.


Finally getting somewhere. I think I have about  15000 stitches left to go!


Christmas Wreath. Etched brass "Ivy" from PPD ltd. Each leaf was bent into shape with tweezers, painted with water paints, then lightly varnished and bent around a small brass hoop, and held in place with wire.