Translate

Showing posts with label tutorial. Show all posts

Monday, 12 October 2015

1:12 scale cushion tutorial (for pointy corners!)

I wanted to put together this quick little tutorial after Kitty said that she found getting the cushions pointy enough was the bane of her life, strong words, I felt like that once too Kitty...but then I worked out a new way of making cushions, inspired by Gill's patchwork tutorial. :D

I felt so bad about the thought of anyone else suffering with their unpointy enough cushions, I had to get this out there pronto! :D


You will need:-

  • Fabric
  • Needle
  • Thread
  • Paper (preferably graph)
  • Glass beads or stuffing
  • Iron/Hair straighteners


Carefully cut out a template using graph paper, keep it as square as possible, then cut a piece of fabric slightly larger.


Turn the fabric over and place your template in the centre.


Fold fabric (preferably along the grain) using the paper to guide you. Use your nail to press the edge down.


Press the fold, either using hair straighteners or an Iron, you will need to repeat this for each fold.
I use hair straighteners, because they're quite handy for mini ironing.

Make sure to test a scrap piece of your material, just in case it melts. 


Fold as before, but on the opposite side from the last fold, and press. 

Fold as shown, press, then fold the other side and press. Try your best to keep the sides of this particular fold, as square as possible, it helps to begin the fold at either end and move inwards towards the centre, using your fingers to press the fabric down.


Now make another one. I usually use plain fabric for the back, to conserve the printed fabric. An old pillow case is a great source of plain fabric.

Abracadabra.........the fabric will now change (apologies for the continuity error, we will now be demonstrating with a new fabric...)


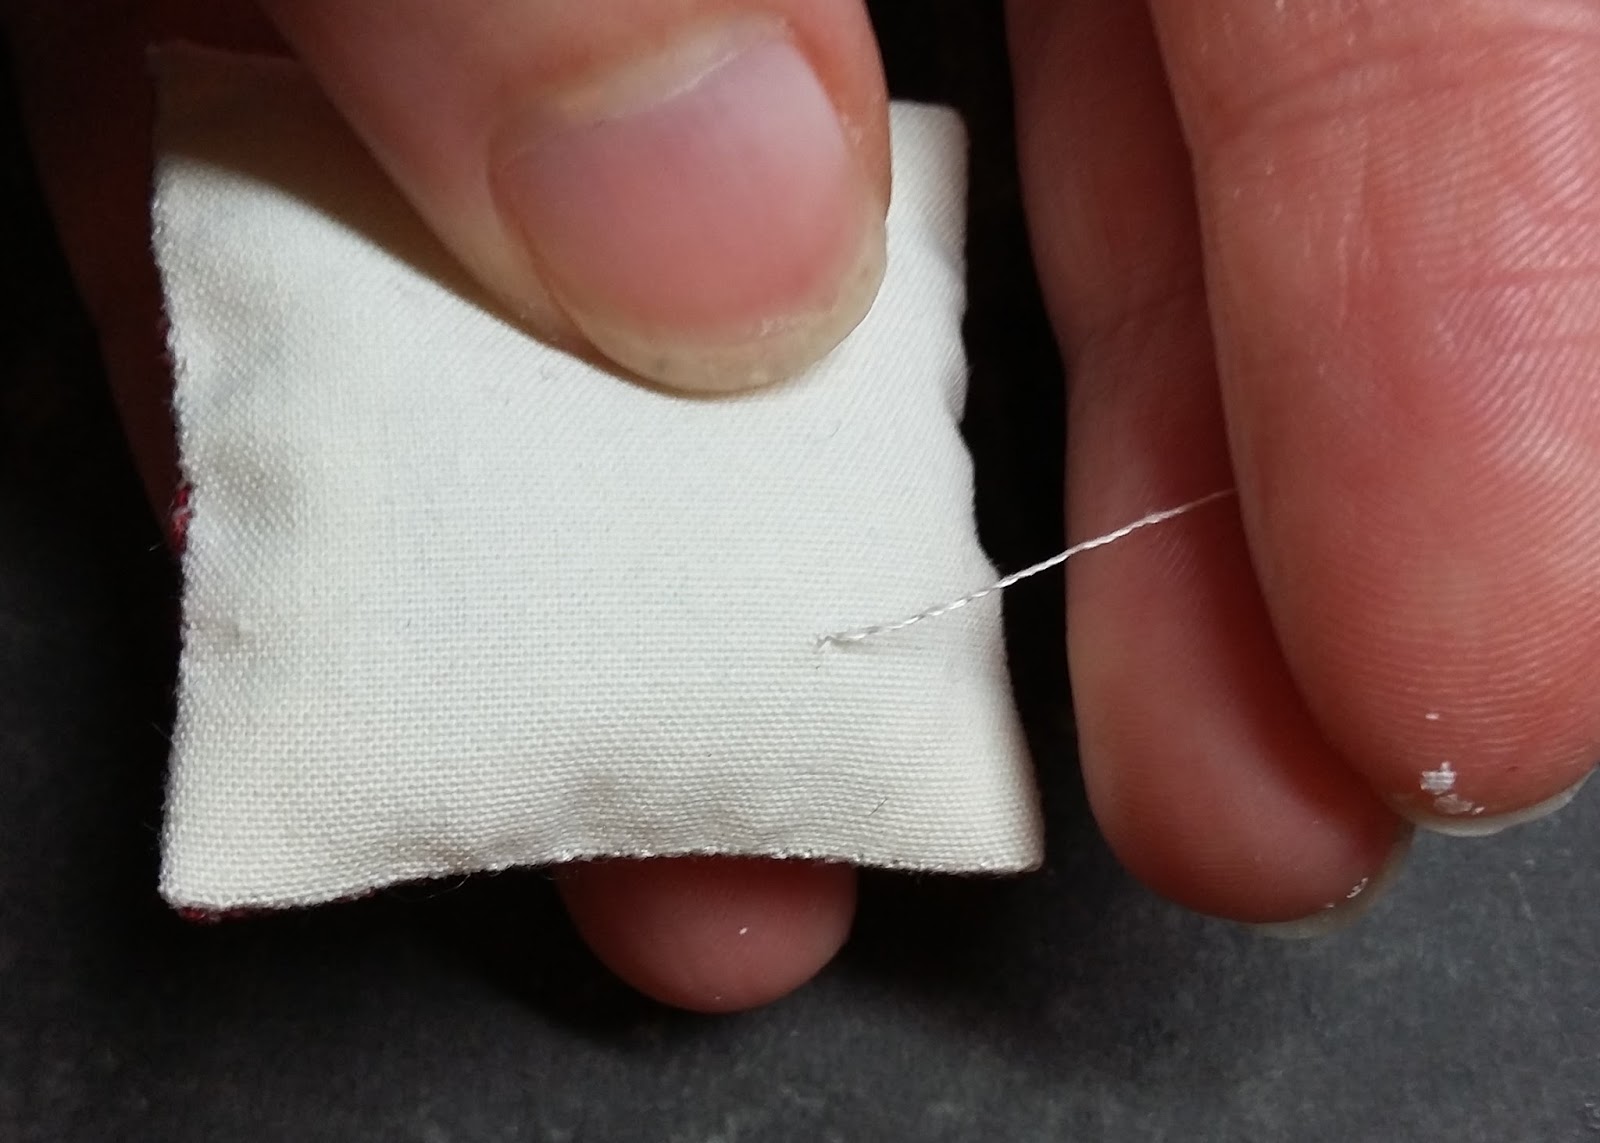
Cut a length of fine thread, for this cushion I think I used about 35 cm. Tie a knot at one end, thread it, and insert the needle into the corner from the reverse of the fabric. 


You should sew from this point, where you can see the folds (this means you will have a less fussy edge to sew later on). Connect the two with your needle and thread as shown.


Now that the two pieces are joined, begin sewing your cushion together. I use the ladder stitch, putting the needle under just a thread or two of the fabric. Do not sew the inner folds together, work over them. 


Ladderstitch diagram.


When you are almost back at the beginning, you can start filling the cushion. I use micro glass beads, I can't remember which size, but I bought them from Mohair Bearmaking supplies. I  hold the cushion over a jar of them, and use a teaspoon to drop them in, until it's just right. You may have to smoosh the cushion a bit to fit them in as you go.


Now carefully holding the cushion, sew up the hole, still using the ladderstitch. 


Sorry for the blur, under the last stitch at the corner put the needle under and draw through until you are left with a small loop...


...then put the needle through this loop and draw through to create a knot close to the corner. Repeat once or twice more. 


Then push the needle down through the corner as shown (where you just made the knot)


Push the needle through the cushion until it pops out somewhere on the other side.


And cut the loose thread. If there is a little short bit poking out after you have cut the thread, smoosh the cushion and it should disappear.
The only downside about this method, is that the stitches will be slightly more visible than they would be if you used the "turning inside out" method, you can always glue a strand of thicker thread around the cushion to act as piping, which I haven't tried out yet, but I imagine it would work very nicely. 

Now back to my secret project, until Christmas...

Byeeee! :)

Friday, 24 April 2015

1:12 scale Wire basket tutorial

Ray Storey Glass bottle, Mini Mundus washstand kit and Daffodils kit by Bonnie Lavish


Before starting, you will need straight wire. You can use a dremel tool and vice to straighten wire.  You will need to run some wire wool down the unstraightened wire first, put one end of the wire into the drill and the other in the vice, then pull the wire taught, wait for the twang to end then briefly switch the dremel tool on. Run your finger and thumb down the wire to make sure it isn't kinked, and wear goggles whilst the tool is switched on...or like me, close your eyes and hope for the best!  There are other ways to straighten wire, but this is the way that works for me.


You will need:-

  • Wire (suitable for soldering)
  • Solder and flux
  • Soldering iron (preferably one with flame)
  • Wire snips
  • Wooden block or similar (something that you don't mind getting burnt..)
  • Wire wool
  • Graph paper
  • Masking tape
  • Stainless steel tray


To work out the length of the wire pieces needed, place them against your block as shown, the parts touching the wooden block will be the base of the basket, and the overhang will be the sides.


To work out the number of wires needed for each side, place the block onto a piece of graph paper. I've chosen to use each 1mm square as the spacing guide. The blue lines indicate the other wires needed, that aren't shown. Make sure to leave a small space at either side, as indicated by the red arrows.

You will need to do this again, with the other side of your block (if you're using a block with equal sides, then just double the number you got originally)

Once you have all of your wires cut to length, carefully wash them in soapy water and leave to dry, and only handle with tweezers afterwards.


Let's try and explain this... You have to stick down strips of masking tape on to the back of a stainless steel tray, with the STICKY SIDE UP!.  The horizontal strips have to be parallel with a gap slightly less than the height of one of the wires...and the same for the vertical strips, with the other length of wire... The following pictures will probably help to make sense of this..moving on..


By the way, you have to do all of the above so that you can slip this little bit of graph paper under ;)


Use tweezers to place the wires as shown, using the graph paper as a guide to keep everything straight and evenly spaced.  


Then lay the other wires on top as shown...


Use a paintbrush to apply flux under the wires, being careful not to dislodge or bend them.


You will need two strips of masking tape to hold down the top wires, at either end.  This helps to make sure the top (horizontal) wires are all in contact with the bottom (vertical) wires. Be careful not to tack them down too tightly though, it's mostly to make sure they don't move about when applying the solder.


Use a craft knife to slice off little bits of solder. You can try using them at that size, or you can be mad like me, and cut each slice in two, as the red line indicates.


Welcome to the most awful part! You now need to carefully place each bit of solder so that it "might" be touching the upper and lower wire at the same time... HAVE FUN! You can actually lift the solder pieces by touching them with your tweezers or even a tapestry needle, they're that light, thankfully the flux on the wires causes them to stick on quite easily, no balancing act, you'll be glad to hear.

Once they are all in place you can use the flame of your soldering iron to melt all of those little bits of solder...and hope everything goes to plan.


And then you will be left with something like this.. I burnt mine slightly!.. but the show must go on., and a few bits of solder did NOT join the wires either..luckily it does the job regardless....And I'm not doing all of the above again for aesthetic purposes! :D


To make the rim of the basket, get a length of the straightened wire, and bend it around the block. You will need to twist the ends together, which is a bit tricky.   And I only had one hand at the time to demonstrate this, the other using the camera, so this is a mirror image of one half of a picture. You use your index fingers to push the wires together so they cross over close to the block, this makes it easier to twist them. Hope this weird picture helps!  P.s. You don't want to make the "wrap" too tight, the vertical wires of the basket mesh need to fit between the "wrap" and the block.


Make two small twists by hand..


Then use pliers to twist them a bit tighter and closer to the block. 


Use pliers as shown, and then clamp tightly.


..Now both sides of the wire meet in a straight line, then you can snip the excess of the twist as shown. Don't snip the twist off!


You can now remove the wrap from the block, and clamp the twist in pliers, as shown.


Now you have a lovely straight join. Lovely!


Place the mesh over the block.  It was at this point, I realised a wire was missing from the vertical section of the mesh..whoops!


Using your fingers to firmly hold the base of the basket mesh to the block, use a ruler or something similar to carefully bend the wires over each side of the block. It helps to  roll the ruler over the wires, so place the ruler slightly back as the red arrow indicates, then roll it towards you. Don't worry about them not being straight as you bend them, you can tidy them up later.


Just wanted to stick this extra photo in, in case the above one didn't make much sense... I'm not Martha Stewart by the way! :D


Now with the wire mesh formed over the block, you can carefully shimmy the wrap down, until you have it where you want it.


Due to that missing wire from earlier, I've decided to fan the wires out slightly on this side, but they should have been vertical. I quite like it though! Anyway...Use your paintbrush to put flux on the wires as shown.


In order to get a good join, all of the vertical wires, need to be touching the horizontal wire. You can use a bit of folded tin foil or tea light foil, until that is achieved. Then place a sliver of solder as shown, and blast with the soldering flame. Work one side at a time.


Er..having technical problems.. Don't forget to flux and solder the twist! It is important that all vertical wires have soldered properly to the horizontal wire, unless you don't mind having a "vintage" basket.


When you remove the basket from the block, snip off the excess wire, including the twist, and carefully file the edges.  Make sure to clean the basket with soap and a toothbrush or wirewool, to remove the flux residue. I would imagine you could paint these, Tamiya spray paint would probably work very well.

Click here for a great tutorial by a Japanese miniaturist, for making an umbrella frame, which should be very useful for people with more advanced miniature wirework ideas.

Thursday, 3 July 2014

1:12 scale Key tutorial


For this tutorial, I will be making a simple key, with an oval head. All the heads were made by wrapping wire around needles. The oval is a more common key head, though you can get keys with circular heads. The fancier key heads are created using finer wire, with some of the loops opened out, by pushing a bigger needle through, to create "C" shapes which were then positioned to create trefoil shapes, etc.


You will need:-

  • Gas soldering iron
  • Wire
  • Solder
  • Flux (I used Templers Telux in a tin, the only flux in the local hardware shop :D )
  • Pliers
  • Tweezers
  • Tapestry needles (aka big needles)
  • Superglue
  • Card
  • Cutting blade


Before doing anything, run the wire through some wire wool, or lightly sand it with sandpaper. Bend the wire across the back of the needle as shown. Wrapping the wire around the Eye of the needle will create an oval shape.

Use pliers to gently squeeze the wire ends, so that they cross over, as shown.


Either use the nose of the pliers or your fingertip, to push between the wires so that they cross as close as possible to the eye of the needle 


The way the wires cross will dictate which way to twist the ends. Twist the ends tight and close to the needle, one or two turns is sufficient.


Clamp the wire loop between pliers to secure the bend, and to flatten the loop.


I took this photo before doing the clamping. After you have clamped the loop, snip off the excess as shown.


Finished loop.  Could have snipped that a bit more neatly......


I used a Dremel Gas soldering iron. This one is a Dremel 2000-6 Versatip. I use it without the tips. When I bought mine, I found the instructions a little hard to follow, especially refilling it. So here is a really good video showing it being filled. I was still a bit confused though, as my cigarette lighter fuel can came with lots of nozzles! You don't use any of the nozzles. Just stick the "straw" into the hole at the base of the Dremel.  I think all hobby gas soldering irons require you to use the lighter refill gas, I used Swan universal gas lighter refill, which has a lovely picture of a swan on it :D

Regarding soldering tiny things, here is another good video. My method was quite a bit different, but I did find her explanation useful.

You can also see how I made a bracket, using a gas soldering iron, in this post.

P.s. I am not a soldering expert, far from it. Anything I am doing has been picked up from others on the internet. I still can't solder using a tip, but the gas soldering for me, is working very well, so if you're worried about "not being good at soldering", don't!  And the flux IS important!


I painted a bit of flux onto the back of a baking tin, to help hold the pieces.  I then positioned a piece of straight wire, with the oval at the top. All the wire that you use, must be washed in soapy water and dry before this stage, then use a paint brush to lightly coat with flux. I have a paintbrush that I use for flux. Just set the wire down on the tin, dab the paintbrush with a bit of flux and dab the wire.  I find flux quite difficult to remove from the paint brush, however using an abrasive cleaner or something like Cif removes it from this stainless steel baking tin.

If you have straight wire, use it. If you don't have straight wire, tools will be needed. Awhile ago, I saw a youtube video for straightening wire with a drill and a vice, I have both, so I gave it a go. I used my dremel rotary tool as the drill.  You put one end of the wire in the dremel jaws, and the other end in the vice, pull tight-ish, and switch on, briefly. AND WEAR GOGGLES. The wire occasionally, snaps and flies off somewhere, never to be seen again. If you have neither a drill device or vice, you could probably just straighten the wire with pliers. Such a small piece is required, you could probably get away with it.


Using a sharp cutting knife, slice a tiny bit of solder off the solder wire, about the size of a grain of "granulated" sugar, and carefully place it over the join. This is easier said than done.  I use a needle usually, a bit of a knack to it. You can use your flux paintbrush, but its quite hard to get the solder bit to transer, when you're working this small. It needs to be lightly picked up. Persevere, you'll get the knack! If it drops off in the wrong place or it moves the two pieces, just use a needle to push everything back into place.


Switch the gas soldering iron on at full blast, and come in at the piece slowly. I heated from a short distance, so that the flame wasn't visibly touching the piece, then as soon as I saw the solder "blob", I moved the flame in quite close, until the solder flowed into the join. I also moved the flame about as though I'm using it as a tiny hairdrier. I don't know if that affects anything, but it feels right! :D Once the key body is finished, wash in soapy water and dry, before gluing and painting.


Oh yes! The cautionary tale! Cause of death = Burnt house down whilst making miniature keys.

 Sometimes when soldering, the pieces will move away from each other, so to combat this, I was using a long needle as a tool for pushing them back together, or holding them in place, whilst using the gas flame. It was working fine, until I held it there too long. It doesn't take a genius to know that metal things can get hot! And it got hot....fast. I don't quite remember what happened next, but I know that when I jumped the soldering iron left my hand briefly, and twirled around, how I managed to catch it without burning myself, I have no idea!  I suppose as a lesson for the inexperienced, ACCEPT A FAIL RATE, and don't try to fix it, by coming in with metal tools to poke it about! :D  I am thinking about making a wooden handle for a needle...........non conductive! Anyway, I thought I should mention this, probably nobody would be as daft as I was, but you never know what you might do to save a miniature in the making :D


For the key teeth, I used a strip of card. This one is approximately 3mm high, the measurement is not compulsory at all, but I thought I should mention it, probably the smallest easiest size to work with. Using the tip of your cutting blade, cut two lines, easily done by just pressing the tip into the card.


Er......slightly off centre. Aim to have the tip of the blade in the middle and gently press down, in order to create a tiny cut to remove the excess.


So there are the teeth, looking a bit like a "C", which is fairly simple to achieve, a bit hurriedly done here though. You can make up your own, or just copy the shapes I made for the keys in the photograph at the end of this post. They reminded me of Tetris when I was making them, I even had the theme tune playing in my head when I was cutting them all out.


Dispense a small amount of superglue onto something unimportant...and carefully dip the "red" edge into the glue. It's important not to use too much as you can accidentally make the teeth stick to the tweezers, but enough so that it sticks to the wire. I applied too much and too little quite a few times. If it happens, try again, and again, and again, luckily it's only inexpensive card!


Another fun fiddly bit! Still holding the teeth in the tweezers, attach as shown. You can either try attaching it while the key body is laid on the surface just by sticking it to the wire and then using a needle to gently push it over so that it is flush with the work surface, or you can attach it whilst holding the key body and place the teeth tab roughly in the right place and then set it down on the work surface and gently push down the tab with a needle. There may be a chance it will stick to the table, once it's on the table, push the key body gently to ensure it hasn't stuck. 


Once the glue has set, you can paint the key. I used Humbrol enamel paint. If you want the keys to be rusty, you can use a bit of brown water colour paint on them, before they fully dry. Pastels would probably work too. If the paint is tacky it will hold the pigment. Once the key is dry, you can snip just below the teeth, and use paint to touch up the clean cut.


I made an Oz key for fun. Return to Oz is one of my favourite childhood films, I still enjoy watching it even though I am 30 (still getting used to that!). In the film, Billina the Hen (belonging to Dorothy), finds the key to Oz whilst scratching about in the yard. It had fallen to earth the night previously via a shooting star. Dorothy then uses a twig to poke the soil out of the holes at the top of the key, revealing the OZ monogram, which I always found incredibly satisfying!
My Billina is possibly an old Falcon miniatures hen, all I can be sure of, is that it was made in America.


I wrapped wire around a needle to create a circular loop and then set a tiny bit of wire diagonally, with a bit of solder at either end, to create the OZ monogram.
I made two of these, but I think this is the one that is in the photograph above, its a bit messy around the teeth here, I hadn't noticed the paint blob until later.


If you are really bored, you can play "Spot the Oz key" below :D