Translate

Saturday, 23 June 2012

1:12 Toilet and other things.

I wanted each of my blog posts to host only the one project, but as time is going on I have so much in various stages of completion that I have decided just to post what I am doing as I go along rather than the finished piece, and the blog is supposed to be my diary, so I can look back and see how long its taken me so far... So a bit about the toilet. Anyone doing up their 1:12 house will notice there isn't much available in the bathroom department. This idea will be useful to people who want to make their bathroom a bit more unique. The toilet was originally a plain wood high flush toilet. The materials were not that expensive. I think I spent under £10 in materials for the toilet alone, including the bought toilet. Count in the man hours though and it will probably be hundreds of pounds, as this did take some time to make. I chose to make a Victorian/ Edwardian embossed style of toilet. Though you could use nail decals to make a patterned toilet, if embossed wasn't what you were after. Or just a plain white one. A lot of toilet photos to follow.


Original toilet. You can see one of the pencil guidelines I have put in to help me shape the toilet. The lid is also going to be refined. I used a dremel sanding tool, and good old fashioned sandpaper for the whole shaping process.  I also used das clay here and there later on.  I can't remember where I bought my toilet, but you can get the same one on eBay, at DHD kitchens shop for £5.45. Mine was about £5. P.s. The bathroom floor tiles in this photo came from http://www.dollshouse-tiles.co.uk. Spent quite a bit on those, but they do look convincing and they are very shiny. They are colour code M1.


Though I have started embellishing the bowl, I still wasn't happy with the base, in the next photo you can see it has become shorter in length. It isn't noticeable in the photographs, but I sanded an indent to the rear of the bowl, to make the bowl more defined.

And this is the bowl in its final shape.


I bought these filigree wraps on ebay, and carefully shaped them around the bowl. Any gaps underneath I filled in with grace clay (from Japan, though a fine filler would probably work as well) and used a wet paint brush to blend into the filligree wrap. The base was refined further.

As an afterthought, I added a tiny ball chain to the top of the wrap, so there are a few gaps here and there, where it wouldn't fit because of the wrap. That's what happens when you do things on the hoof, and it will forever annoy me.


There is a balancing act going on in this photo. Nothing is secured yet. I still have to  make a  permanent water pipe, the one in place, you could call a prototype. The cistern is exactly as it was when it was bought, with the addition of filigree wraps, many coats of  paint and a flush handle, which is actually a door handle. I bought that at Miniatura, from Tony Hooper. The toilet seat has been wood stained. When ready to put in place in the bathroom, it will have two small brackets under the cistern. 


The glossing technique!! I used a few coats of white primer on the toilet first. Then there are about 4-5 coats of Humbrol white gloss paint on the toilet. I  "watered" down the paint with white spirit, until it was the consistency of single cream (watery single cream, anyway) and carefully applied it in sections so it spread out over the surface and dried smooth, without leaving "join" or brush marks. Drying time for each coat took two days! So put a glass bowl over your glossed items immediately, and cat hairs and lint won't be a part of the finished object.


Obviously, this is not a toilet. The Del Prado chair from the old dollhouse. This kit came free with one of the Del Prado dollhouse magazines (1990s).  Although it was one of the best pieces of furniture I had in the childhood dollhouse, I thought it needed revamped, and I didn't want to throw it away. So I stripped it, reshaped the sides and reupholstered.


Half finished. Because the reupholstery is done in specific stages,  I can't fix the side panels, until the front legs are in, so this will be sitting on a crate, until I can find the right legs for it. For now it is shabby chic.


My Arak Saruk rug from Micro Stitchery finally arrived. Just in time for their half price sale to start.  Can't win them all.  Three days work in this photo. I don't think this will be finished anytime soon.  It is a daunting pattern for a needlepoint beginner, but I am pleased with how I am coping with it. No major mistakes yet. I did what they said and worked from the centre out. I can see why this is so important. Miss one stitch on the border and a whole row is out of the pattern. Great miniature needlepoint tips from Bobbie Schoonmaker (who designed this rug), and also Janet Grangers website are helping me to make this rug.


Tuesday, 12 June 2012

Dressing table and Bathroom sink

Two pieces I have had in the works for months. And they still aren't completely finished. 


Dressing table. The mirror with drawers is a bought piece, which I've had since I was a child. It was originally mahogany.  I refined it with sandpaper, rounding the edges of the frame, etc. Using a silky mitt, intended for your legs, gives a really nice matt finish to 1:12 painted objects. It also wears away the edges in scale. The table, is also an old piece of dollshouse furniture, mass produced Made in China stuff from the 90s, I have a box full of it. It has been rejigged and had new legs (spindles) put on. A few more coats of paint and fine sanding, and it will be finished.


Mirror board from Phoenix miniatures.  Just to show the realistic reflection it gives. That jewellery squirrel tree is in my  life size bedroom.  The original mirror had too much "depth", it was quite thick, though I read somewhere if you use a black marker round the edge, this is resolved. But I lost the original mirror anyway, so...

Dressing table drawer handle, made with a brass picture nail, with a tiny bead cap superglued on top, with the head of a tiny pin superglued on top of that. A hold your breath moment setting that in place.

It is a really dull day today, it usually is. I don't like using flash in the dollshouse, but I had no choice, I wanted this photo for the records.  Picture on  Phoenix "Wilkswood" fireplace, is a Canadian stamp.


Not quite finished... Sink made from gloss painted Das clay and wood offcuts. The cast iron support is a bar table, from Phoenix Miniatures, though the  'box' surrounding the sink is a plastic sticker, painted pewter. The taps are made from ear bullet posts, wooden dowel, pins, crimp beads and model ship cowl vents and wheels. Taps are waiting for some gold leaf. Eventually, I will get round to finishing off the taps and sink surround. 


Birds eye view of the sink. Shell soap dish, is a jewellery finding pushed into the clay and painted . Plug hole is a brass wheel (model ship part) with a washer on top. No plug for it yet!

Wednesday, 6 June 2012

1:12 Victorian donkey pull toy

I don't intend to have a nursery in my dollshouse, so this will be on show as a vintage ornament. I really like the donkey pull toy in one of my family photographs, so decided to make a miniature one for the house. Didn't quite manage to get the ears and the legs as fine as I would have liked. The donkey is made from fimo, over a tiny wire armature, then flocked with finely cut wool. I used crochet thread for the bridle, reins and edging on the leather saddle, which is all held in place with dots of superglue and pva glue. The wooden base was an offcut, and the wheels are one side of a snap button with the centre filed down to make a hole, a pin then inserted, with the remainder of the pin glued into a small piece of brass tubing acting as the axle.

My great aunt Rita Lynas circa 1905

Close up of the pull toy used as a photograph prop.

4cm high and 3.3 cm long. Actually donkey alone is 3.5cm high. £1 coin for scale.


I put a dot of nail varnish on the eye to give the impression of glass eyes. Very hard to see in photographs.


Tuesday, 29 May 2012

Brass Bed


This has been a long time in the making and gathering of materials. I had to measure and cut all the tubing by hand with a file, and then mark and drill all the holes by hand. I could not have done this without my vice. I haven't yet worked out exactly how much I spent, probably about £30- £40. It isn't exactly 1:12 scale. It measures 14.5 (l) x 11 (w) x 11 (h) cm. So if in the real world, its just over 5 1/2 feet long. I decided to make it shorter and slightly smaller than a double, but bigger than a single, so it wouldn't cramp the room too much. The materials for the bed frame are brass and copper tubing, angled brass, crimp beads, various metal beads, gold ear bullets, 1:12 scale brass door knobs, 1:12 scale castors and two small turned pieces of brass I bought from a model ship website. It's all held together with tiny copper tubing dowels in hand drilled holes (I used a small drill bit held in an Excel blade handle), using superglue and araldite.  The mattress is also handmade, it had to be, since the bed isn't "standard". I bought the material on Ebay (Piglets Pincushion). It is hand sewn together, stuffed and buttoned ( no buttons though, I used crochet thread). I kept the edges rigid by using lengths of acetate sewn inside, before it was turned inside out for stuffing and "buttoning". 


Bed with wooden posts in the bedroom,(testing the height, before cutting the tubing) which I then later replaced with brass tubing. Waste not, want not, those wooden posts are now being used in the construction of "plaster" brackets for my window ledges.


I've just noticed a bead I forgot to glue in place. 50p for scale.


The bed looks quite short from this angle, but I'm hoping with the right bedding, I should be able to hide that.  


And two chairs for the kitchen...

Two Mini Mundus kit chairs, rejigged, using model ship balusters and stencil stickers, needs a few more coats of paint. The chair back on the right,  unintentionally, looks like a cat. Both the chair pads are made from sample material I bought for 5p each in a market and stuffed with no hole beads.

Monday, 14 May 2012

A few things being worked on.

I have a lot of things being worked on.  These are a few of those things.


The unfinished back door.  Bought online, one of the mass produced doors available, slightly customized. I try to customize anything I  buy, it usually just needs refined.  The door handle I bought from Modelling Timbers website. I used black sticker lines to make the stained glass, and filled in the perspex with clear varnish and acrylic ink, for a glassy effect. The Chinese lantern poking in at the side, I made with etched brass I bought from PPD Ltd, an old light fitting scrap wood and copper rods. Even it isn't  finished, even though its up in its place.


A Dollshouse birdhouse. A dovecote I made from scratch using lollypop sticks, card and  cocktail sticks and a few other odds and ends. I made the ridge tile using card, quite a few jewellery fittings and flocked it with ground up Richard Stacey bricks, the bits left over from the chimney stack. The roof needs a dusting, badly. No birds have moved in yet, though I have two in mind. But they have no feet yet!


Some cushions I made, some with scraps of material I bought at a market. The grey bench cushion hasn't been filled yet. And the bolster on the end is a Janet Granger kit, without its tassels, which I bought to try out needlepoint. I have a Bobbie Schoonmaker Arak Saruk rug kit arriving soon, so I thought I should practice on something small first. Just as well it worked out, as I think the  Bobbie Schoonmaker kit may be stuck in customs, so I can look forward to an additional bill. Then after that, I design and make my own rugs from scratch, because I can't afford them, really. Bench is a kit by McQueenie Miniatures. Excuse the out of scale cat hairs by the armrest. They get everywhere, I think I stitched a few into the bolster also.


Thursday, 3 May 2012

The unfinished kitchen, hundreds of hours later

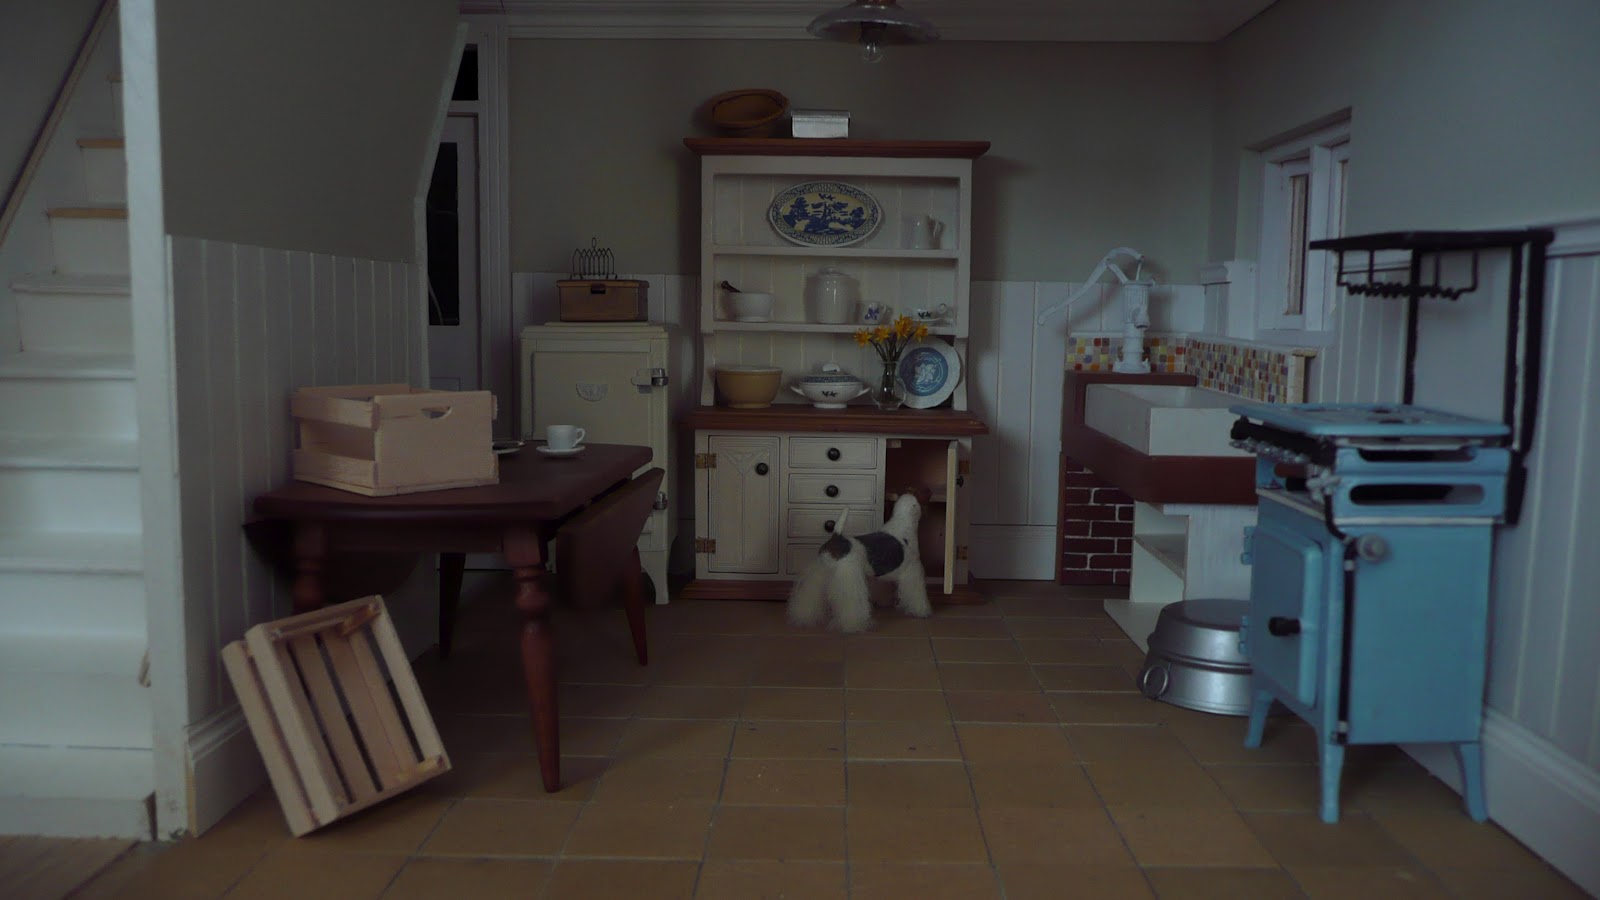
The rooms in the house are roughly 10" wide and 11" deep. The kitchen is nowhere near finished,  yet it is already looking a bit crowded. I have had to make bought furniture a bit smaller here and there. The fridge and the cooker are Phoenix kits. I had to knock part of the side wall down, so the fridge wouldn't look too crowded. That was a fiddly job, since the house is already built, my arm was through the window space to drill and saw at it. I ended up making the sink and stand myself. I couldn't find anything online that could be customized to suit that space in the room. The sink itself is made from Das clay, with a handmade wooden surround topped with a Phoenix water pump, the Rayher mosaic tiles, I got from a craft shop, they were in a sale at 99p a pot, which made those a bargain. The dresser was a popular cheap one I found online. I repainted it, took its feet off, and replaced the drawers and cupboard doors with new detailed ones, made from scratch. I also changed the profile of the upper shelving sides, by filling in the cutaway that was previously there for decoration at either end of the shelves, and adding a deep curve at the base, thanks to my dremel tool. The table is a Mini Mundus kit. I was seriously unhappy with the wood supplied for the top, it was quite a soft wood, not as soft as balsa, maybe bass, so I replaced it with a denser wood cut into planks, with edging.

 A lot of hours spent sanding, painting, adjusting, fitting and glueing together so far!


Richard Stacey gault tiles. I made the little crate under the table with coffee stirrer sticks, I always lift a bundle of those  when I buy an overpriced expensive cup of coffee in town.


View through side window.  A little rodent picture, homage to my first pet rat Amber, who used to hide in that space under the stairs, back in the days when the dolls house wasn't quite as serious. It was made with an old british postage stamp (celebrating the poet Robert Burns - To a mouse) and stuck to a button.


The first thing I made for the kitchen. An industrial style light shade. Made with a 1:12 tin tray, a metal button and some pieces salvaged from the old lighting. The little basket on top of the dresser was a first attempt at basket weaving, using wire and waxed crochet thread. Definitely must find a basket weaving book and make more intricate ones.


My custom made table top, with some of the things bought at the Miniatura show in Birmingham.  Teapot and Charplate are Stokesay Ware, trowel, honey dipper, basting brush, pastry cutter are by Danny Shotton. The spice box is by Susan and Sandy Eismont.

1:12 Wire haired fox terrier

I have a wire haired fox terrier, in real life, called Becky. Initially I was going to have a quick fix in the form of a "flocked" Schleich dog or something similar, but there were none that I particularly liked the shape of. In real life, I cut my dogs hair, so I am very familiar with her shape, and decided to have a go at sculpting her in fimo. I got alot of help from reading this  http://miniatures.about.com/od/topartisangalleries/ig/Kerry-Pajutee-s-Animals/Kerri-Pajutee-Sculpting.htm

Unfortunately, I lost the patience to finish the flocking properly, so its been set aside for the time being. Im too ashamed to show its current state, close up, particularly round the face. Its terrifying! You need self discipline and patience to do this kind of work, and I currently have lost it on this project. But it will come back, eventually.


A very rudimentary dog head.

And its body.

Many hours later and ready for the oven.  A bit sadistic this bit...

Surprise! Quite a jump from the rudimentary head and body. No photos to show the progress, i was too busy filing, sanding and needle poking etc.  The nose is slightly too big, exaggerated by the cameras macro setting, also adding to the "too big".

A slightly different angle. From front paws to the tops of the ears, she stands 4.4 cm.  

A bad paint job, but will be covered in flocking anyway.  
The real dog, sadly not the finished 1:12 dog.

An empty cupboard, just like real life. Not really, she is well looked after.  I haven't actually finished the flocking yet, alot more work to be done, so she looks best viewed from afar and behind, for the moment. Whilst she has been standing around without her fur on properly, I had been busy doing up the kitchen. Which is also in various stages of progress. Too many distractions.