Translate

Showing posts with label rug. Show all posts

Sunday, 22 December 2013

Happy Miniature Christmas!

Really late with this Christmas post, and nearly everything that I wanted to do, hasn't been done. I didn't think that little decorations would take so much time to make, so no mince pies or turkey, not even time for the presents under the tree, yet again! And then I had to remove the cat hair from the tree and garland. Hoovers do not remove cat hair, so it was cellotape and tweezers for that job. I will not be leaving those lying around, EVER AGAIN, MINNIE (the name of that cat). So this is a work in progress for next year, I think I will have to make the festive items throughout next year, starting from the beginning of 2014.

Anyway, do come in, though it is a little sparse...don't stay too long, as there is LITERALLY NOTHING TO EAT OR DRINK.

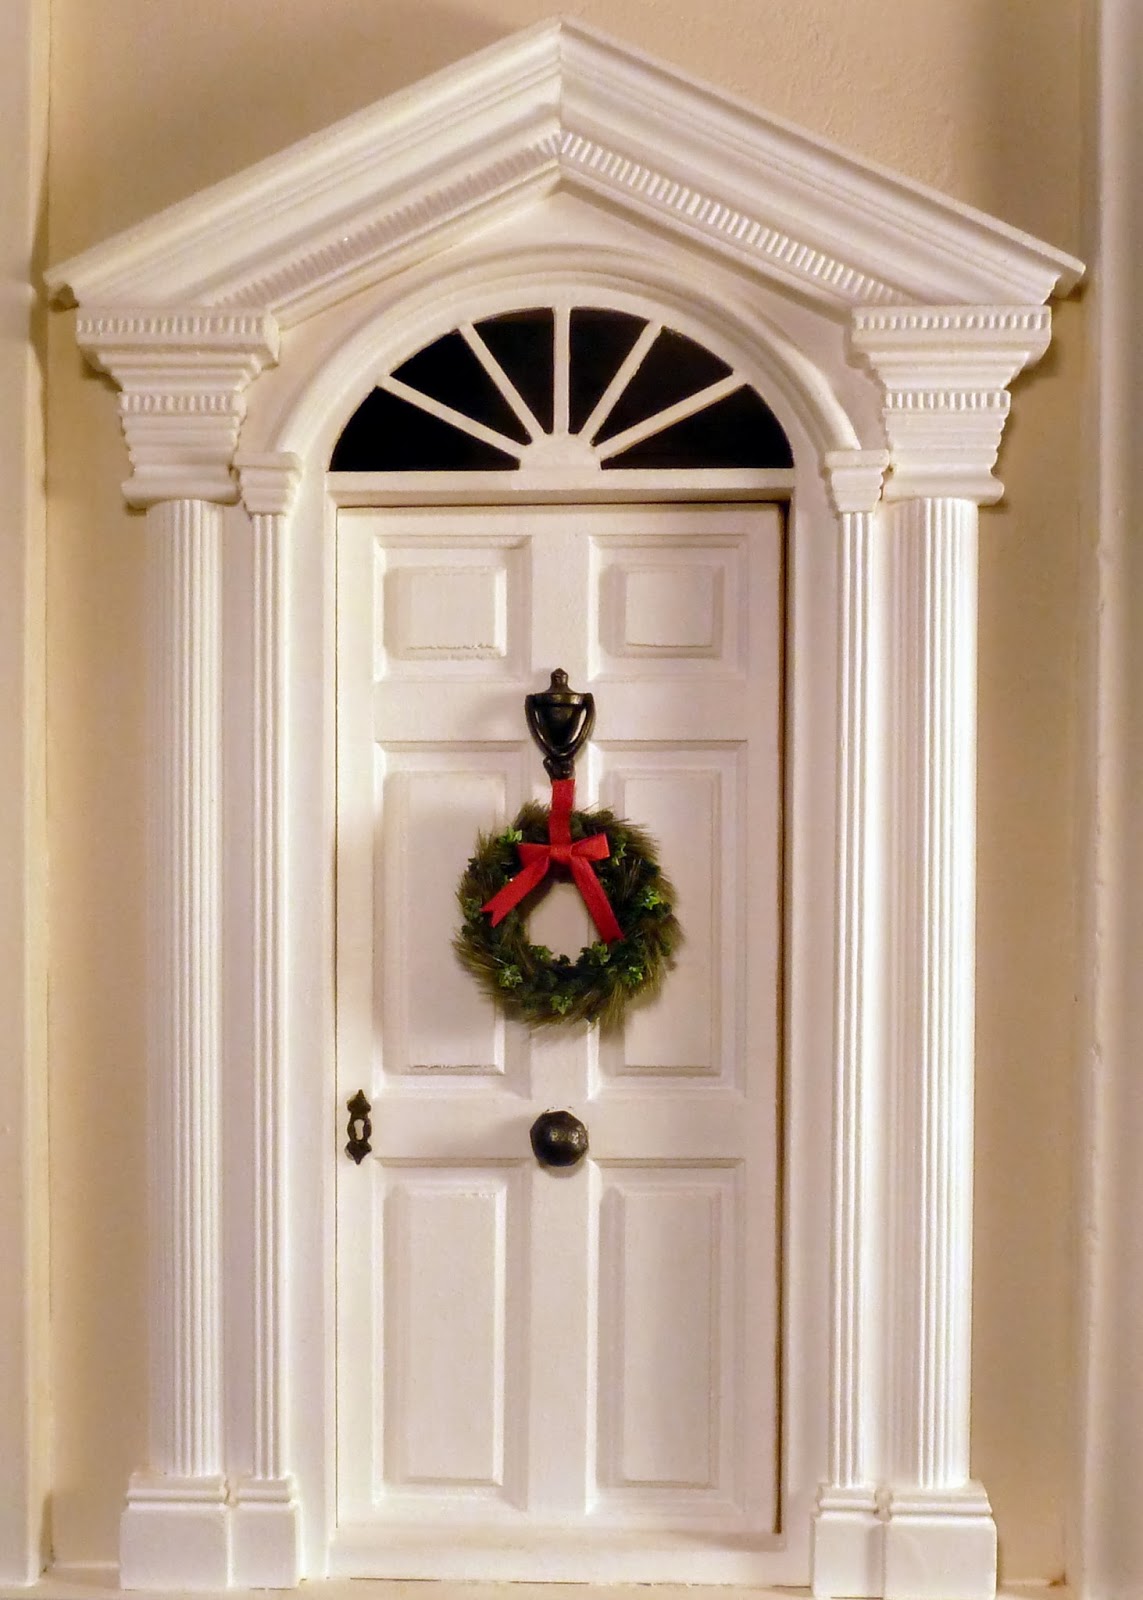
The front door is a bought one, the door furniture is by Tony Hooper. The miniature wreath base is a keyring fob, covered with tufts of model railway grass, fine chenille yarn and brass ivy leaves, the bow is made with raffia ribbon. The wreath is not actually finished, neither is the door :D 


 The fireplace was an old resin one I had, which I modified by cutting out the old fire basket, and replacing it with a phoenix miniature one. Though it should sit further back than that, which would require cutting a hole in the wall or making a false back.  The hearth is made with Richard Stacey tiles, left over from the kitchen floor. The fender was made with miniature scale dado rail, beads, copper rod and card. Oh, and the needlepoint rug is FINISHED. Without a fringed edge, I haven't worked up the nerve to try doing that yet. 


The mirror frame was made using miniature frame wood, with pieces of brass stamping arranged over it and then painted. The branch is an Alder twig, with the cones removed and brushed lightly with white paint, you can't see the ornaments very well, but they are Swarovski crystals. The garland was made using the same materials as the wreath minus the ivy. The stag is an old sterling silver charm.  The star tree topper is a jewellery finding mounted on a wire spiral. The fire logs......are not very artistically arranged :D I just bunged them in. Shopping list for next year, fire lighting and led nano chips for the tree.


Donkey had some otoplasty done for Christmas, my treat, I ripped his old ears off, and gave him some new finer ones. By pasting the back of some fabric with pva glue, I was able to cut out new ears without the edges fraying, which is how Bears' ears were done. The base of the ear is then glued into a slot on the head.  The skates are pretending to be drying off. I had wanted to hang them somewhere, but at the moment there is nowhere to hang them :D


 The baubles are a mix of beads, filigree, fluted and swarovski. Each bauble has a silver crimp bead superglued on the top with a wire loop to attach the waxed thread loops. Which took forever to do, and when I thought I had made enough the tree was only one third decorated.  The robins I made last year, the snowflakes are lasercut paper from True2Scale. The tinsel is Turrall chenille sparkle in micro. 


The dresser is a bought one, with the doors and drawers customised. The star ornaments on the "nail head" handles are jewellery findings, with no hole beads glued onto them. (The dresser needs feet, the phoenix fridge, isn't finished either...)


The runner is an old ribbon, the design is woven into it, I have been saving it for years....  The candle is a cocktail stick painted and dipped in wax. The twine heart is made from paper covered wire, wrapped with thread. The "bells" are crimp beads on wire. The pine cones are made with paper.  The key is by Tony Hooper. The owl is a sterling silver charm. The bauble garland is made with small filigree beads and miyuki glass beads. The finer chain was one I bought on Ebay last year. The wooden heart, is just that, with a piece of detail from a postage stamp stuck to the front.


The snowdrops are a Georgie Steeds kit. A plate of mince pies or christmas biscuits, would have looked nice and festive beside that pot..just pretend they are there :D


Not much to say here really, except that I hope I have not lost the handle of the fridge, I have just realised, it isn't there :D


"FAKE snowdrops!!!!!!"


Teddies do not drink or eat anyway, but they look great sitting beside empty tea cups and a giant matchstick.


Shake paws :) I don't know why he is smirking..
And that is Christmas here, over......I am really annoyed there were no mince pies!

Hope you all have a lovely Christmas and New Year! Thanks everyone for following and for your comments this past year.


Friday, 4 January 2013

Spindle Back Arm chair by Colin Bird... and a bit late / very early Christmas tree.

I first saw Colin Birds chairs on his website. And although the pictures show how amazing they are, it isn't until you have one "in person" that you realise just how dainty they are. When I saw them all sitting together at his stall at Miniatura, I put one on my Christmas list, though I had to order early, as there is a waiting list, not surprisingly, and the chairs are made from scratch so they take time to make. Colin Bird explains the details of his craft on his website http://www.colinbird.co.uk/about.html. He has also written an article, for AIM, about bending wood, which I will definitely have a go at sometime. http://www.artisansinminiature.com/photo2_3.html

I haven't taken as many pictures as I would like to, as the light levels here have been bad, due to the cloudy weather. And it is hard to photograph the chair well, without distortion.  I have used lamps for lighting today, which I hate to do, but they haven't come out too badly.


Spindle Back Arm Chair by Colin Bird http://www.colinbird.co.uk/index.html.  Made with Cherry wood and Laburnum (seat).  The Cherry wood is sourced from a Cherry tree in Colins garden. The chair is incredibly light, yet strong with a beautiful sheen and depth to the wood. You can see the spindles reflect on the seat in this photograph. So much time and skill in this tiny chair. The chair is signed, discreetly on the underside of the seat.


No Christmas presents, except the chair of course, which my dad bought for me.   I made the tree using pipe cleaners, cocktail sticks, dowelling and acrylic paint. The star is cut from a brass sheet, using a jewellers saw.  Pot is temporary. It is a miniature terracotta pot, painted silver.  The tree is a magnet for cat hair and fluff.  Little presents for next year maybe.


Handmade Christmas decorations. Cut out of wood and perspex using a jewellers saw.  The robins are handpainted on both sides,  and each ornament has a tiny hole drilled, with the cord and wire glued in place.  The silver chain I bought on Ebay.


And the rug is almost finished, sort of. 

Christmas in the new conservatory, which I've been busy with lately. Almost finished. The outdoor scene is a magazine page, which is just there today for fun.

Happy Belated Christmas and New Year!!

Sunday, 2 September 2012

1:12 shopping bag and stoneware jars.


 I made the shopping bag from a 5p sample and  plain fabric (from an old pillowcase). The rope is made from waxed thread (I ran the thread over beeswax, it makes it easier to handle and hold a shape too).  There are videos on youtube for a rope braid (hairstyle tutorials).  Easy to do, once you get the hang of it.


And the jars are painted, varnished and ready to be placed, placed where though, Im not sure.

And my break from this, didn't last long. Comparing to the last photo I took of it,  Im slightly shocked it hasn't changed much, after the hours I put into it. This is going to take a very long time. 


Saturday, 23 June 2012

1:12 Toilet and other things.

I wanted each of my blog posts to host only the one project, but as time is going on I have so much in various stages of completion that I have decided just to post what I am doing as I go along rather than the finished piece, and the blog is supposed to be my diary, so I can look back and see how long its taken me so far... So a bit about the toilet. Anyone doing up their 1:12 house will notice there isn't much available in the bathroom department. This idea will be useful to people who want to make their bathroom a bit more unique. The toilet was originally a plain wood high flush toilet. The materials were not that expensive. I think I spent under £10 in materials for the toilet alone, including the bought toilet. Count in the man hours though and it will probably be hundreds of pounds, as this did take some time to make. I chose to make a Victorian/ Edwardian embossed style of toilet. Though you could use nail decals to make a patterned toilet, if embossed wasn't what you were after. Or just a plain white one. A lot of toilet photos to follow.


Original toilet. You can see one of the pencil guidelines I have put in to help me shape the toilet. The lid is also going to be refined. I used a dremel sanding tool, and good old fashioned sandpaper for the whole shaping process.  I also used das clay here and there later on.  I can't remember where I bought my toilet, but you can get the same one on eBay, at DHD kitchens shop for £5.45. Mine was about £5. P.s. The bathroom floor tiles in this photo came from http://www.dollshouse-tiles.co.uk. Spent quite a bit on those, but they do look convincing and they are very shiny. They are colour code M1.


Though I have started embellishing the bowl, I still wasn't happy with the base, in the next photo you can see it has become shorter in length. It isn't noticeable in the photographs, but I sanded an indent to the rear of the bowl, to make the bowl more defined.

And this is the bowl in its final shape.


I bought these filigree wraps on ebay, and carefully shaped them around the bowl. Any gaps underneath I filled in with grace clay (from Japan, though a fine filler would probably work as well) and used a wet paint brush to blend into the filligree wrap. The base was refined further.

As an afterthought, I added a tiny ball chain to the top of the wrap, so there are a few gaps here and there, where it wouldn't fit because of the wrap. That's what happens when you do things on the hoof, and it will forever annoy me.


There is a balancing act going on in this photo. Nothing is secured yet. I still have to  make a  permanent water pipe, the one in place, you could call a prototype. The cistern is exactly as it was when it was bought, with the addition of filigree wraps, many coats of  paint and a flush handle, which is actually a door handle. I bought that at Miniatura, from Tony Hooper. The toilet seat has been wood stained. When ready to put in place in the bathroom, it will have two small brackets under the cistern. 


The glossing technique!! I used a few coats of white primer on the toilet first. Then there are about 4-5 coats of Humbrol white gloss paint on the toilet. I  "watered" down the paint with white spirit, until it was the consistency of single cream (watery single cream, anyway) and carefully applied it in sections so it spread out over the surface and dried smooth, without leaving "join" or brush marks. Drying time for each coat took two days! So put a glass bowl over your glossed items immediately, and cat hairs and lint won't be a part of the finished object.


Obviously, this is not a toilet. The Del Prado chair from the old dollhouse. This kit came free with one of the Del Prado dollhouse magazines (1990s).  Although it was one of the best pieces of furniture I had in the childhood dollhouse, I thought it needed revamped, and I didn't want to throw it away. So I stripped it, reshaped the sides and reupholstered.


Half finished. Because the reupholstery is done in specific stages,  I can't fix the side panels, until the front legs are in, so this will be sitting on a crate, until I can find the right legs for it. For now it is shabby chic.


My Arak Saruk rug from Micro Stitchery finally arrived. Just in time for their half price sale to start.  Can't win them all.  Three days work in this photo. I don't think this will be finished anytime soon.  It is a daunting pattern for a needlepoint beginner, but I am pleased with how I am coping with it. No major mistakes yet. I did what they said and worked from the centre out. I can see why this is so important. Miss one stitch on the border and a whole row is out of the pattern. Great miniature needlepoint tips from Bobbie Schoonmaker (who designed this rug), and also Janet Grangers website are helping me to make this rug.